
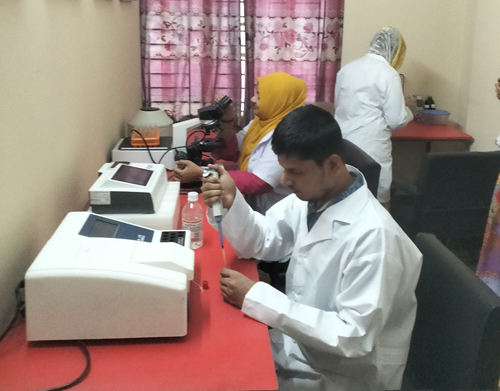
Internship for Diploma Students in Medical Technology
Internship for Diploma Students in Medical Technology. Mobile Phone 01797522136, 01987073965. HRTD Limited (Training, Diagnostic Center, and Supplier) offers an Internship for Diploma Students in Medical Technology Courses, like Diploma in Medical Technology ( Lab Medicine), and Diploma in Medical Technology (Dental Technology). Students of the Pathology Course 1 Year, Pathology Course 2 Years, Pathology Course 3 Years, Pathology Course 4 Years, Dental Course 1 Year, Dental Course 2 Years, Dental Course 3 Years, Dental Course 4 Years, Physiotherapy Course 1 Year, Physiotherapy Course 2 Years, Physiotherapy Course 3 Years, and Physiotherapy Course 4 Years can take this Internship. The duration of the Internship is 6 Months and 3 Months. Weekly Labwork 3 Days.
6 Months Internship for Diploma Students in Medical Technology ( Lab Medicine)
Admission Fee Tk 10500/-, Monthly Fee Tk 6000/-, Exam Fee Tk 4000, Total Internship Fee Tk 50500/-
Internship Topic: CBC, TC, DC, Hemoglobin %, ESR, Blood Grouping, Lipid Profile Test, Kindy Function Test, Urine R/E, Bleeding Time, Cloting Time, Vitamin-D Test, Electrolyte Test, Prolactin Test, TSH Test,
3 Months Internship for Diploma Students in Medical Technology ( Lab Medicine)
Admission Fee Tk 10500/-, Monthly Fee Tk 6000/-, Exam Fee Tk 2000, Total Internship Fee Tk 30500/-
Internship Topic: CBC, TC, DC, Hemoglobin %, ESR, Blood Grouping, Lipid Profile Test, Kindy Function Test, Urine R/E, Bleeding Time, Cloting Time, Vitamin-D Test, Electrolyte Test, Prolactin Test, TSH Test,
Complete Blood Count Test (CBC Test) Internship for Diploma Students
A Complete Blood Count (CBC) test is a common blood panel that counts and measures your red blood cells, white blood cells, and platelets, plus hemoglobin and hematocrit, giving vital info about infection, anemia, blood disorders, and overall health, often used in routine checkups or to diagnose symptoms like fatigue or weakness. It helps doctors diagnose conditions, monitor treatments, and screen for health problems, providing a comprehensive look at blood cell numbers, sizes, and shapes.
What It Measures
- Red Blood Cells (RBCs): Carry oxygen.
- White Blood Cells (WBCs): These cells fight infections and diseases.
- Hemoglobin (Hb): Oxygen-carrying protein in RBCs.
- Hematocrit (Hct): Percentage of blood volume made of RBCs.
- Platelets: Help blood clot.
- Red Cell Indices (MCV, MCH, etc.): Measure size and hemoglobin content of RBCs.
Why It’s Done
- Diagnosis: Identify the causes of symptoms (such as fatigue, fever, and bruising) or diagnose anemia, infection, or blood diseases.
- Monitoring: Track existing blood disorders or see how treatments (like chemotherapy) affect blood.
- Screening: Part of routine physicals to check general health.
CBC Test Procedure:
A CBC (Complete Blood Count) procedure involves a healthcare professional drawing a small blood sample, usually from a vein in your arm or sometimes a finger prick, after cleaning the skin and applying a tourniquet. The blood is collected into a tube, labeled, and sent to a lab where it’s analyzed by an automated machine to count and measure red blood cells, white blood cells, hemoglobin, hematocrit, and platelets, providing insights into your overall health, infections, and anemia.
During the Procedure (The Blood Draw)
- Preparation: You’ll sit comfortably, often with your arm extended.
- Tourniquet: A rubber strap (tourniquet) is tied around your upper arm to make veins more visible.
- Cleaning: The skin over the chosen vein (usually the inner elbow or hand) is cleaned with an antiseptic wipe.
- Needle Insertion: A needle is inserted into the vein, causing a brief prick or sting.
- Collection: Blood flows into a small tube.
- Removal: The tourniquet is removed, the needle withdrawn, and pressure applied to the site with a bandage.
- Duration: The actual draw takes only a few minutes.
In the Laboratory (Analysis)
- Sample Analysis: The tube is sent to a lab where automated analyzers use electrical or light sensors to count and measure different blood components.
- What’s Measured: Red blood cells (oxygen transport), white blood cells (infection fighting), hemoglobin, hematocrit (red cell volume), and platelets (clotting).
- Results: Results are typically available within hours to a day, often reported with normal reference ranges.
Total Count Test Internship for Diploma Students
A “total count test,” usually called a Complete Blood Count (CBC), is a common blood test that measures all the cells in your blood (red cells, white cells, platelets) plus hemoglobin and hematocrit, helping diagnose infections, anemia, leukemia, bleeding disorders, and monitor overall health or treatment effects. It involves taking a blood sample from a vein, and results show if cell numbers are too high or low, indicating potential issues like infection (high WBCs) or dehydration (high RBCs).
What a CBC measures:
- White Blood Cells (WBCs): Fight infection; high counts suggest infection/inflammation, low counts can mean immune issues.
- Red Blood Cells (RBCs): Carry oxygen; low counts often mean anemia, high counts can mean dehydration.
- Hemoglobin (Hgb): Oxygen-carrying protein in RBCs.
- Hematocrit (Hct): Proportion of blood volume made of RBCs.
- Platelets (PLT): Help with blood clotting; low levels increase bleeding risk, high levels can relate to inflammation/cancer.
Why it’s done:
- Check general health and screen for disorders.
- Diagnose conditions like anemia, infection, leukemia, and bleeding problems.
- Monitor chronic illnesses or effects of treatments like chemotherapy.
Total Count Test Procedure:
A “Total Count Test” usually means either a Total Leucocyte Count (TLC) (White Blood Cell count) in blood or a Total Viable Count (TVC) (microbial load) in surfaces/water, with procedures involving sample collection (blood draw or swab), preparation (dilution/plating), incubation, and cell/colony counting using microscopes or automated counters to assess health or contamination. Both aim to quantify elements (cells, microbes) within a specific volume or area, using different methods for biological vs. environmental samples.
1. Total Leucocyte Count (TLC) – Blood Test Procedure
This counts your white blood cells, indicating infection or inflammation.
- Sample Collection: A healthcare professional draws a small blood sample from a vein in your arm using a sterile needle.
- Lab Preparation: The blood is placed in a tube, often diluted with a specific solution (like ammonium oxalate for platelets, but different for WBCs).
- Microscopic Counting: The sample is loaded onto a special grid (hemocytometer) under a microscope.
- Calculation: Cells are counted in specific squares, and the total is multiplied by dilution factors to get cells per cubic millimeter (e.g., multiply by 50 for WBCs).
- Automated Method: Labs use automated analyzers for faster, more precise counts.
2. Total Viable Count (TVC) – Microbiological Test Procedure (e.g., Surfaces/Water)
This checks for general microbial contamination.
- Sample Collection: Use a sterile swab to wipe a specific surface area (e.g., 10cm x 10cm) or collect a water sample.
- Preparation/Dilution: The swab is rinsed into a tube with sterile diluent (like peptone water), or the water sample is diluted.
- Plating: Spread plated (spread plate) or poured (pour plate) onto agar (nutrient-rich medium) in Petri dishes.
- Incubation: Dishes are incubated (e.g., 37°C for 18-24 hours) to allow microbes to grow.
- Counting: Colonies (visible clusters of microbes) are counted on the plates, often with a colony counter, to determine Colony Forming Units (CFU) per volume/area.
DC Blood Test Internship for Diploma Students
A DC blood test (Differential Count) is a detailed analysis of your white blood cells (WBCs), breaking them down into five types (neutrophils, lymphocytes, monocytes, eosinophils, basophils) to assess your immune health, detect infections, inflammation, allergies, or blood disorders, often done alongside Total Count (TC) and ESR tests as part of a larger health check. It helps pinpoint issues like bacterial vs. viral infections or allergic reactions, revealing the root cause of symptoms like fever or fatigue.
What it measures (the 5 WBC types):
- Neutrophils: Fight bacterial infections.
- Lymphocytes: Target viruses, cancer cells (B & T cells).
- Monocytes: Clear pathogens and dead cells.
- Eosinophils: Handle parasites and allergies.
- Basophils: Release enzymes in allergic responses.
Why it’s done:
- To diagnose infections (bacterial, viral, parasitic).
- To investigate inflammation or autoimmune issues.
- To monitor blood disorders or cancers like leukemia.
- To find the cause of unexplained fever, fatigue, or bruising.
What to expect:
- Preparation: Usually none, but check with your doctor if other tests (like fasting for glucose) are ordered.
- Procedure: A standard blood draw from a vein.
- Results: Interpreted by a doctor to diagnose conditions, often alongside Total Count (TC) and ESR tests.
DC Bood Test Procedure:
A DC (Differential Count) blood test procedure involves a standard blood draw from a vein, often with no fasting needed, followed by laboratory analysis where a technician spreads the blood on a slide, stains it (like Wright’s stain), and then visually counts and classifies different types of white blood cells (WBCs) under a microscope, or uses automated machines to identify neutrophils, lymphocytes, monocytes, eosinophils, and basophils, helping detect infections, inflammation, or allergies.
1. Preparation (Before the Test)
- No special prep usually needed: Often, you don’t need to fast, but always confirm with your doctor or lab for specific instructions.
2. Blood Sample Collection (Phlebotomy)
- Site: A lab tech finds a vein, usually in your elbow or hand.
- Cleanse: The skin is cleaned with an antiseptic wipe.
- Tourniquet: A rubber band (tourniquet) is placed on your arm to make the vein more visible.
- Draw: A needle is inserted to collect blood into a tube, often with an anticoagulant like EDTA to prevent clotting.
- Bandage: The needle is removed, and a bandage is applied.
3. Laboratory Analysis (The “DC” Part)
- Smear: A drop of blood is spread thinly onto a glass slide (a “blood smear”).
- Staining: The smear is stained (e.g., Wright’s stain) to color the different cells.
- Counting/Classification:
- Manual Method: A trained person visually examines the slide, counting and classifying 100-200 white blood cells (WBCs).
- Automated Method: Machines analyze thousands of cells quickly.
- AI: Some labs use AI to automate this process, examining even more cells.
- Types Counted: The test identifies percentages of Neutrophils, Lymphocytes, Monocytes, Eosinophils, and Basophils, looking for abnormal cells.
4. Results
- Results typically come back within hours to a day and are given to your doctor, who interprets them in the context of your health, medications, and other factors.
Hemoglobin Test Internship for Diploma Students


A hemoglobin test measures the iron-rich protein in red blood cells that carries oxygen, helping diagnose conditions like anemia (low levels) or polycythemia (high levels) and checking overall health, often as part of a routine Complete Blood Count (CBC). It involves a simple blood draw, with results (grams per deciliter – g/dL) indicating if levels are normal or suggest issues like iron deficiency, blood disorders, or lung/heart disease, providing clues to doctors about your body’s oxygen supply.
What It Is & Why It’s Done
- Measures Hemoglobin: This test quantifies the oxygen-carrying protein in your blood.
- Part of CBC: Usually included in a routine blood test to screen for various health problems.
- Diagnoses Symptoms: Used for fatigue, weakness, dizziness, or shortness of breath.
- Monitors Conditions: Tracks treatment for anemia, polycythemia, or blood disorders.
- Screens for Disorders: Checks for inherited issues like sickle cell or thalassemia.
How It Works
- A healthcare professional draws a blood sample, usually from a vein in your arm.
- The blood is tested to find the hemoglobin concentration.
Normal Ranges (Approximate)
- Men: 13.8 to 17.2 g/dL.
- Women: 12.1 to 15.1 g/dL.
- Children: Varies by age (around 11-16 g/dL).
- Newborns: Higher (14 to 24 g/dL).
What Results Mean
- Low Levels: Can signal anemia, iron deficiency, chronic diseases, or significant blood loss.
- High Levels: May point to lung disease, heart disease, or polycythemia vera (too many red blood cells).
Hemoglobin Test Procedure:
A hemoglobin test procedure involves a healthcare provider taking a small blood sample, usually from a vein in your arm (venipuncture) or a finger prick (for quick checks/newborns), after cleaning the skin, then sending it to a lab for analysis, often using an automated machine to measure how much hemoglobin is present, with results indicating levels against normal ranges for diagnosis.
Preparation
- Usually, none needed: For just a hemoglobin test, you can typically eat and drink normally.
- Fasting may be required: If other blood tests (like a CBC) are done with it, your doctor might ask you to fast (no food/drink) for several hours.
During the test (Venipuncture)
- Site prep: The provider cleans a spot on your arm (inner elbow) or hand with an antiseptic wipe.
- Tourniquet: A band is placed above the site to make the veins visible.
- Needle insertion: A small needle goes into the vein, causing a brief pinch or sting.
- Blood collection: Blood fills a small tube.
- Bandage: The needle is removed, and a bandage is applied.
Other collection methods
- Finger prick: For quick point-of-care tests, a lancet pricks a fingertip, and blood goes on a strip or into a vial.
- Heel stick: For newborns, a heel is pricked for a few drops of blood.
After the test
- Lab analysis: The sample goes to a lab, analyzed by automated machines.
- Results: Levels are reported in grams per deciliter (g/dL) and compared to normal ranges (e.g., ~13.2-16.6 g/dL for adult men, ~11.6-15 g/dL for adult women), indicating potential anemia or other conditions.
ESR Blood Test Internship for Diploma Students
An ESR (Erythrocyte Sedimentation Rate) blood test, or “sed rate,” measures how fast red blood cells settle in a tube, indicating inflammation in the body, as inflamed cells clump and fall faster. It’s a non-specific test, meaning it shows if inflammation is present (due to infections, arthritis, autoimmune diseases like lupus, or some cancers) but not where or why, requiring other tests for diagnosis, though it helps monitor treatment effectiveness for inflammatory conditions.
How it Works
- Blood Sample: A small blood sample is taken from your arm.
- Settling: In the lab, the blood is placed in a tall, thin tube (Westergren tube).
- Measurement: The distance (in millimeters per hour, mm/hr) red blood cells fall in one hour is measured.
- Result: A faster settling rate (higher number) means more inflammation.
What High ESR Means
- Inflammation causes certain blood proteins (like fibrinogen) to make red cells stick together (rouleaux formation), making them heavier and fall faster.
- Conditions indicated: Arthritis, infections, inflammatory bowel diseases, lupus, giant cell arteritis, polymyalgia rheumatica, and certain cancers.
What Low ESR Means (Less Common)
- It can be linked to kidney disease, high red blood cell count (polycythemia), or certain genetic conditions, but often considered normal or less significant than high levels.
Normal Ranges (Vary by Age/Sex)
- Generally, Men under 50: <15 mm/hr; Women under 50: <20 mm/hr; Older adults often have slightly higher normal ranges.
ESR Test Procedure:
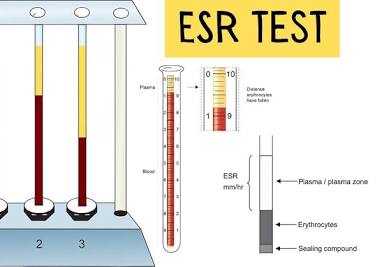


An ESR (Erythrocyte Sedimentation Rate) test procedure involves a simple blood draw, where blood is placed in a tall, thin tube (Westergren tube), and the distance red blood cells settle in one hour is measured in millimeters (mm/hr) to detect inflammation, as inflamed cells clump and fall faster, indicating a higher ESR.
Step-by-Step Procedure:
- Blood Sample Collection: A healthcare professional draws a small blood sample from a vein, usually in your arm.
- Sample Preparation: The blood is mixed with an anticoagulant (to prevent clotting) and transferred to a special vertical tube (Westergren tube).
- Sedimentation: The tube is left undisturbed for exactly one hour.
- Measurement: After an hour, the height of the clear plasma (the liquid part of the blood without cells) that has formed at the top of the tube is measured in millimeters (mm).
- Result: The result is reported as millimeters per hour (mm/hr), with a higher number indicating faster settling and potentially more inflammation.
What it Shows:
- Inflammation: Inflammation causes red blood cells (RBCs) to stick together, forming heavier clumps that sink faster.
- Non-Specific: An elevated ESR suggests inflammation but doesn’t pinpoint the cause, so it’s used with other tests for conditions like infections, autoimmune diseases, or some cancers.
Blood Grouping Test Internship for Diploma Students
A blood grouping test, or ABO typing, determines your blood type (A, B, AB, O) and Rh factor (+/-) by mixing a blood sample with known antibodies (Anti-A, Anti-B, Anti-D) to check for clumping (agglutination). This essential test ensures compatibility for transfusions, organ donation, and pregnancy care, using forward typing (testing red cells with antibodies) and reverse typing (testing plasma with known cells) for accuracy.
How the Test Works (Simplified)
- Sample Collection: A blood sample is drawn, usually from a vein.
- Forward Typing (Antigen Test):
- Your red blood cells are mixed with Anti-A, Anti-B, and Anti-D (Rh) serums.
- If cells clump (agglutinate) with Anti-A, you have A antigen; with Anti-B, B antigen; with Anti-D, you are Rh-positive.
- Reverse Typing (Antibody Test):
- Your plasma (liquid part) is mixed with known A and B red blood cells.
- This confirms existing antibodies (e.g., Type A blood has Anti-B antibodies).
- Result: Combining both steps reveals your blood type (e.g., A+, O-, AB+).
Key Components
- Antigens: Proteins (A, B) on your red blood cells.
- Antibodies: Proteins (Anti-A, Anti-B) in your plasma that attack foreign antigens.
- Rh Factor: Presence (positive) or absence (negative) of the Rh protein.
Importance
- Blood Transfusions: Prevents dangerous immune reactions.
- Pregnancy: Checks for Rh incompatibility between mother and baby.
- Organ Transplants: Ensures donor and recipient compatibility.
Blood Grouping Test Procedure Internship for Diploma Students
A blood group test (ABO/Rh typing) involves taking a small blood sample, mixing it with anti-A, anti-B, and anti-D (Rh) antibodies, and checking for clumping (agglutination) to identify antigens on your red blood cells, revealing your blood type (e.g., A+, O-, B+) for safe transfusions and pregnancies.
Procedure Steps
- Sample Collection: A phlebotomist cleans a vein (usually in the arm) and draws a small blood sample with a sterile needle, or uses a finger-prick for quicker tests.
- Forward Typing (ABO/Rh):
- The blood sample (red blood cells) is placed on a slide or in wells.
- It’s mixed with known anti-A, anti-B, and anti-D (Rh) antibodies.
- Observation: If cells clump (agglutinate) with anti-A, you have A antigens; with anti-B, you have B antigens; with anti-D, you have the Rh factor (positive).
- Reverse Typing (Plasma Test):
- The liquid part (plasma) of your blood is tested against known Type A and Type B red blood cells.
- Observation: This confirms the antibodies present in your plasma (e.g., Type A plasma has anti-B antibodies).
- Result Determination: Combining forward and reverse typing results accurately determines your ABO group (A, B, AB, O) and Rh factor (Positive or Negative).
Example Result
- Blood Group A Positive (A+): Clumping with Anti-A and Anti-D; no clumping with Anti-B; clumping with known B cells in reverse typing.
Key Components
- Antigens: Proteins (A, B, Rh) on your red blood cells.
- Antibodies: Proteins in your plasma that fight foreign antigens (e.g., Anti-A, Anti-B).
- Agglutination: Clumping of blood cells when antibodies meet their corresponding antigens, indicating the presence.
Bleeding Time Test
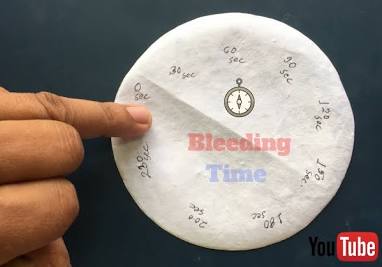

A bleeding time (BT) test assesses how long it takes your blood to clot by making a small cut on your skin, timing how long it takes for platelets to seal the wound; it evaluates platelet function, but is rarely used now due to poor reliability, replaced by modern platelet function assays like the PFA-100. The test involves a superficial skin incision, usually on the forearm, and blotting the site every 30 seconds until bleeding stops, revealing potential platelet defects or vessel issues.
Purpose
- To check how well platelets work to form clots.
- To screen for bleeding disorders or assess bleeding risk before surgery, especially for patients on aspirin/NSAIDs.
Procedure (Traditional Method)
- A blood pressure cuff is inflated on the upper arm.
- A healthcare provider makes one or two shallow cuts (around 1mm deep) on the forearm.
- The cuff is deflated, and blotting paper is touched to the cuts every 30 seconds until bleeding stops.
- The time until bleeding ceases is recorded.
Interpretation
- Normal range: Varies, but often cited as 2-7 minutes.
- Prolonged time: Suggests issues with platelet function or blood vessel defects (like von Willebrand disease).
Why is it less common now
- Insensitive & Poor Reproducibility: The test is difficult to perform consistently and doesn’t always accurately reflect platelet issues.
- Replaced by Better Tests: Modern platelet function analyzers (like PFA-100) offer more reliable results for platelet function.
What to tell your doctor
- All medications, especially aspirin, NSAIDs, or other blood thinners, as affect results.
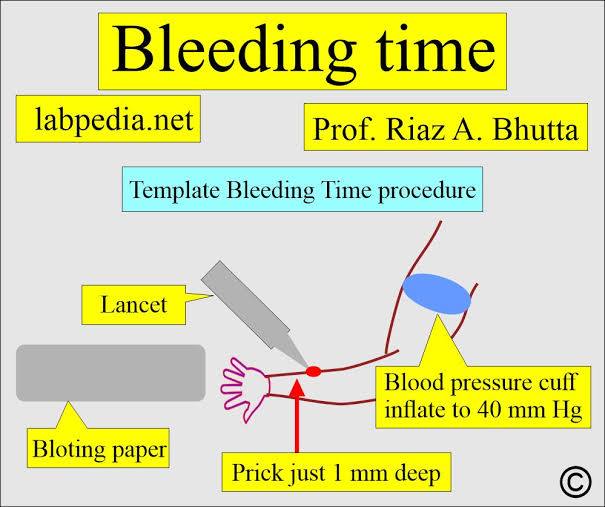
Bleeding Time Test Procedure
A bleeding time test measures how long it takes for a small cut to stop bleeding, typically using the Ivy method (forearm incision with cuff pressure) or the Duke method (earlobe prick). The procedure involves cleaning the site, making a standardized small cut, applying a pressure cuff (for Ivy), blotting the blood every 30 seconds with filter paper until it stops, and then recording the total time, which assesses platelet function.
Ivy Method (Most Common)
- Preparation: Clean the forearm with an antiseptic and let it dry completely. Place a blood pressure cuff on the upper arm and inflate it to a constant pressure (around 40 mmHg).
- Incision: A trained technician makes two small, standardized cuts (about 1-2mm deep, 10mm long) on the forearm.
- Timing & Blotting: Start a stopwatch immediately. Gently blot the blood with filter paper every 30 seconds, being careful not to touch the wound or disturb the forming clot.
- Completion: The test ends when bleeding stops completely, and the time is recorded (normal is usually 2-7 minutes).
- Bandaging: Apply a bandage to the cuts.
Duke Method (Simpler)
- A less invasive stab wound is made on the earlobe or fingertip.
- The process of blotting every 30 seconds until bleeding stops is the same, but no pressure cuff is used.
Key Considerations
- Medications: Avoid aspirin and NSAIDs for 7-10 days prior, as they prolong bleeding time.
- Accuracy: Ensure the site is dry, the timing starts with the cut, and the filter paper doesn’t dislodge the clot.
Clotting Time Test
A clotting time test measures how long blood takes to form a clot, a vital process to stop bleeding, assessing overall blood coagulation by checking platelet function and clotting factors, often using methods like the capillary or test tube method, with normal ranges around 8-15 minutes but specific tests (PT, aPTT, TT) pinpointing pathway issues for conditions like hemophilia or DVT.
What It Is
- Measures the time for blood to solidify (coagulate) after injury, involving platelets and clotting proteins.
- Helps detect bleeding/clotting disorders, liver disease, or vitamin K deficiency.
Common Types (Coagulation Studies)
- Prothrombin Time (PT/INR): Checks the extrinsic pathway (factors like 7, 10, 5, 2, 1), often used with warfarin.
- Activated Partial Thromboplastin Time (aPTT/PTT): Checks the intrinsic pathway (factors 12, 11, 9, 8).
- Thrombin Time (TT): Evaluates the final step (fibrinogen to fibrin), sensitive to heparin.
- Activated Clotting Time (ACT): Quick bedside test, often for monitoring heparin during surgery.
How It’s Done (General Methods)
- Test Tube Method: Blood is collected in tubes, sometimes warmed to 37°C, and tilted at intervals until a clot forms.
- Capillary Method (Duke’s Method): A finger prick; blood touches filter paper every 30 seconds until no stain appears (measures bleeding time, related but different).
Why It’s Done
- Before surgery, to assess risk.
- For unexplained bruising, bleeding, or a history of clots.
- To monitor anticoagulant (blood thinner) medications.
Normal Ranges (Vary by Test)
- General Clotting Time: 4–15 minutes (or 8-15 minutes).
- PT/INR: PT ~11-13.5 sec; INR ~0.8-1.1.
What Abnormal Results Mean
- Prolonged Time (High): Blood takes too long to clot (bleeding risk).
- Reduced Time (Low): Blood clots too quickly (clotting risk, e.g., DVT).
Clotting Time Test Procedure for Diploma Students
A clotting time test measures how long blood takes to form a clot, typically done manually by collecting venous blood into warmed glass tubes or via a capillary method, involving tilting tubes or breaking capillaries at intervals until a fibrin thread forms, indicating the time from blood collection to clot appearance (around 4-10 minutes normally). A key manual method, Lee & White, uses 37°C water baths and checks tubes every 30 seconds until clotting is observed, while automated methods use analyzers.
Manual Test Tube Method (e.g., Lee & White)
- Prepare: Warm 4-5 glass test tubes (8mm diameter) in a 37°C water bath.
- Collect Blood: Draw venous blood into a clean, dry syringe, avoiding air bubbles and tissue contamination, and immediately start a stopwatch.
- Dispense: Transfer 1 ml of blood into each warmed tube.
- Observe: Place tubes back in the water bath. At 30-second intervals, gently tilt each tube to check for clotting.
- Record: The clotting time is when the blood first clots (forms a solid thread) in both tubes, from the moment of venipuncture.
Capillary Tube Method
- Prepare: A sterile lancet pricks the finger, and a small drop of blood is collected.
- Collect: A plain glass capillary tube is used to draw the blood sample.
- Observe: After a specific time (e.g., 30 seconds), the capillary tube is broken at intervals (e.g., every 30 seconds).
- Record: The time when a fibrin thread (a small string of clot) forms between the broken ends is the clotting time.
Key Considerations
- Temperature: Maintaining 37°C is crucial as temperature affects reaction speed.
- Sample Quality: Avoid tissue juices or hemolysis (rupturing red blood cells) for accurate results.
- Normal Range: Typically 4-10 minutes, but can vary by lab.
Activated Clotting Time (ACT)
- Uses a special tube with an activator (like diatomaceous earth) to trigger clotting quickly.
- A faster test is often used in cardiac procedures (e.g., during heparinization).
